Applying a Caparison Transfer to Horses

In this small tutorial, I will try to explain how you can apply heraldic caparison transfers to horses. Due to the complexity of the shapes and the fact that most caparisons (especially on horses in motion) have a large number of folds, I created the heraldry in segments (smaller and larger) to make application easier. Of course, in order to apply the transfers correctly, you must have the appropriate materials and paints—see the article ‘A Beginner’s Guide to Heraldic Waterslide Transfers’.
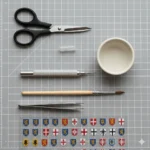
Most importantly, in addition to a brush, water, acrylic paints, and varnishes, Micro Sol or Micro Set, or decal softeners and fixers from other manufacturers, are essential.


Order of procedures
First of all, the models need to be painted with primer and left for the primer to dry. After that, all parts on which transfers will be applied must be painted white (otherwise, the colors will not match those on the transfer paper).

Once the paint has dried, apply decal fixer to the area where the transfer will be placed (with the transfer already prepared and soaked in water for about 10 seconds).

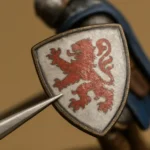
After removing the transfer from the water, separate the top layer from the white backing, then place that layer onto the exact spot coated with decal fixer (I do this using a brush or a scalpel). You will have enough time to precisely move the transfer into the desired position. Gently go over the transfer with a brush or cotton buds so that it adheres to the surface, that is, to squeeze out excess water or decal fixer.
After that, immediately apply decal softener, but only over the transfer (this is very important). Wait about 10 seconds and then gently use a brush to bend the transfer, which has now softened, into the desired shape over folds or contours.


After you have completed the process and softened the transfer with decal softener, achieving the desired shape that follows the folds of the caparison, leave everything to dry. I usually continue the process after 12+ hours.
The process then continues by painting all remaining parts in a color that matches the background color of the transfer, meaning the color surrounding the heraldry (yellow, blue, red, etc.). If you are precise, you can also paint around the heraldry itself (the transfer color) to be 100% sure that the transfer will not stand out or differ in tone. I did this on some of them.


Once the paint has dried, apply the first coat of varnish. It is important that the first coat is gloss varnish. Apply the varnish over the transfer and the painted surrounding areas (varnish the entire caparison). After this coat has dried, apply a second coat of matt varnish. This completes the process.

Tips and tricks
If you are applying a large transfer area to a caparison, do not be afraid of having excess transfer material. What is important is that you apply decal fixer only where you want the transfer to adhere. Do not stick the excess transfer down, but let it remain loose or floating (after you have applied decal softener over the entire transfer). I place small pieces of paper under the excess decal so it does not stick to areas where it should not be.
After about 10 minutes, use a sharp scalpel to cut away the excess transfer by cutting directly along the model and creating a clean edge. This usually happens along the horse’s back, from the saddle toward the tail. Draw a straight line and remove the excess. Repeat the same procedure on the other side.

Carry out the same procedure on the bottom of the caparison as well. Once the excess transfer has dried, it can be easily cut away with a scalpel without damaging the adhered part.
Applied transfers and finished caparisons